
I was away in Perth while the April A2Z Scraplets were released so here is a quick recap of the goodies I got to play with from the new releases. You can see all the amazing new releases on the A2Z Scraplets website and blog.
First up is a layout of my Lil Miss Sunshine using the new Shapes - Starburst 2 Large. I actually cut my starburst centre piece up so it could be adhered to a 12x12 page to create the background shown. I adhered them to a 12x12 piece of Chipboard so it would be strong and sturdy enough for the layering I had planned.
Links to Products: Shapes - Starburst 2 Large & Lil Miss Sunshine


After the chipboard starburst pieces were all dry on the 12x12 Chipboard Background, I have then added a coat of White Gesso over the entire surface. While it was still wet, I then added a layer of Cheescloth and a touch more Gesso using a Brush in a messy rough pattern so that some of the Cheesecloth curled and bunched up into wrinkles.
The next step was to Glimmer Mist this array of beautiful colours.

Checkout the texture of that Cheesecloth and Chipboard!

The flower cluster had some additional Glimmer misting added to help it mesh into the colour bursts better.

Next up is a layout I created for a dear friend using the New Catnapping Chipboard Title.
Links to Products: Catnapping

For this layout I have used the amazing 7 Dots Studio Dreamer Collection of Papers and Stickers.

The Chippie title got a coating of Rock Candy Crackle Paint from Tim Holtz and then some inking and spritzing over the top with some glimmer.

This next layout was created using both the Sweet Memories Title Chipboard and the Starburst Large Shapes.
Links to view Products: Sweet Memories & Starburst

For this layout I have used the amazing Pink Paislee Collection Indigo Bleu! I am just in love with this collection and particularly the fact that it could easily be used for boys and girls!

This chipboard title was a bit of a disaster for me and what I wanted to do didn't look right with the layout colours so after layering and layering of Glossy Accents and a tonne of other mediums, I finally went with this amazing Perfect Pearls finish and I think it works perfectly!

The background Bazzil cardstock was scrunched up into a little ball (hubby did it for me because I was too weak it seems for the Bazzil LOL) and then ironed out flat. After this I have used the Starburst Large Chipboard Shape as a Stencil and sprayed some White Chalkboard Glimmer Mist over the area where I knew the photo would be sitting. I love the subtle starburst effect.

Checkout my handmade denim flowers alongside some Indigo Bleu Pink Paislee Die Cut Shapes curled up and some Tim Holtz Ideaology.

Next up is a layout of my gorgeous cat Buster. Nawww isn't he a cutie?
Links to view Products: Cat-titude

For this layout I have used the Bright Side collection from My Minds Eye along with the new release Chipboard Title Cat-titude from A2Z Scraplets.

The chipboard title had spots of Various coloured Liquid Pearls which were then marbled together using a pin.

The background has had a closeup spritz of White mr Hueys Spray and then I have held the paper upright to let it drip down the paper.

Lots of Washi Tape, stitching, transparencies & staples added to this over rustic effect.

Next up is a layout of my husband and I using the new Hanging Heart.


For this layout I have used some more papers from the amazing 7 Dots Studio Dreamer Collection.
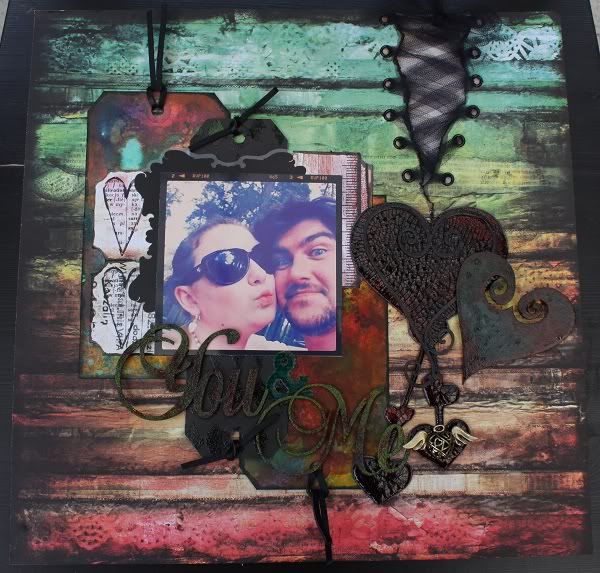
The hanging hearts received a coat of Tim Holtz Rock Candy Crackle Paint followed by some Distress Stains in various colours. The heart shapes were simply coated with rough splodges of Glimmer Glaze.

The You & Me title was coated with some WOW Embossing Powders and the & symbol had an unfortunate accident so was replaced with a Glimmer Glazed Sticker & symbol LOL.

This tulle was hand dyed from white tulle I had in my stash. I then simply tore off some paper and inked the edges. Then with my cropadile I added some Black eyelets to thread the lace through.

Lots of fabulous ink work and embossing on those shipping tags in the background.

Here is another angle shot of those beautiful hearts!

Next up is an 8x8 layout I have created using the new Starburst Shape Large.
Links to Products: Starburst & Daughter Small

For this layout I have used the remainder of my Starburst Large Shape as a frame. Firstly I have sprayed the entire starburst stencil with water and then rolled up each of the starbursts using a pencil. I then zapped it straight away with a heat tool to ensure it dried and stayed the way I wanted it to. I gave a quick Spritz over the top of Crushed Shells Glimmer Mist and then heated again with my heat tool. After it was completely dry, I adhered it to the background paper that I had picked out and painted the edges with Tattered Rose Crackle Paint. A final Glimmer Mist Spray was added when the crackle paint was dry so that the cracks showed up better.
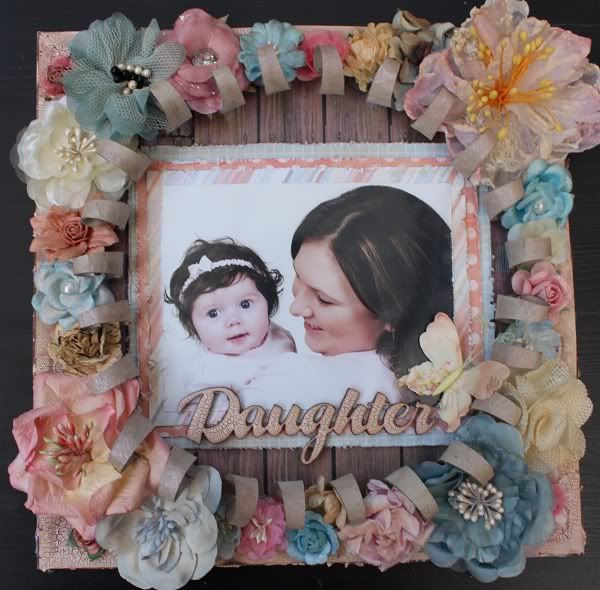
The Daughter Chipboard Title was also given the same Tattered Rose Crackle Paint followed by Glimmer Mist spray over the top. All the patterned paper has a hint of glimmer mist added also.

I have added a tonne of flowers around the edges of this layout. It truly is breathtaking

Closeup of the curls.

Closup of the Crackled Edges and more curls

Next up is a very very simple layout for me but I just don't feel that it needed anything else done to it. I have used the new Eyes are the Windows to the Soul Chipboard which is soooo pretty.
Links to View Products: Eyes are the Windows to the Soul

For this layout I have used the gorgeous new Spring Jubilee Collection from Pink Paislee.
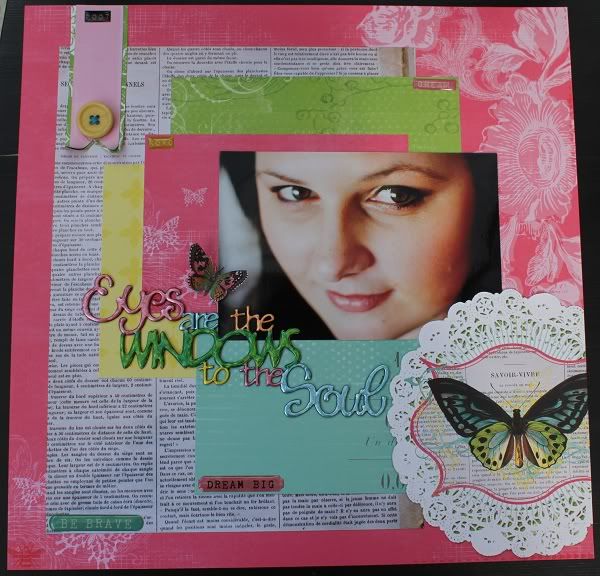
The chipboard title has a beautiful array of Liquid Pearl Colours added and some marbling of 2 tone green on the word WINDOWS.

This beautiful Doiley was cut from another patterned paper in the collection

A simple button and date was all I felt that was needed for this layout however there is hidden journalling on the back of this tag as well.

WOW what a crazy amount of inspiration and photos! So sorry if they took forever to load for you but I hope it was worth the wait.
Thanks for stopping by and until next time....Happy Scrapping!
Amy Prior xxx