Please excuse any untidiness while I makeover my blog among other projects and endeavours.

Wednesday, March 7, 2012

Vintage Treasures

Hi there! As some of you may know, I have started to create some canvases  for what I am calling my "Inspriation Wall" here in my Scraproom/Office Space. The wall will eventually have 9 12x12 canvases up and each canvas will represent a different style/inspiration/colour scheme that I love and that I find inspirational. This feature wall of a sort is the first wall in view when entering my space and will be a huge statement. I am very excited with this project and how they are each coming together.

My first canvas I created was "Colour Your World" and was actually picked up by Scrapbooking Memories for publication so I unfortunately had to remove it from all online publications for now but stay tuned!

This next canvas I have been working on for a couple of weeks now because I have been so busy it has been sitting here neglected unfortunately but I am happy to report that it is now complete and ready to share with you all.......


Here are a few closeups so you can see the amazing texture and different treasures up close! There is so much to look at on this fabulous canvas.


Beautiful Manor House Creations Flower in the centre of this flower cluster and alongside Prima, Kaisercraft, Green Tara and more!


I love the shadows created by the many layers of colour.


So much glimmer and shine that these photos were impossible to take LOL


More yummy texture and glimmer. I finished the canvas off with a coat of Helmar Antique Acrylic Sealer.


And now for a quick tutorial on how I created this fabulous background. 

I have started off with a 12x12 Primed Canvas and I then glued lots of random treasures around like a border leaving a rough circle in the centre. The colour and make of these elements did not matter as they were going to be primed with Gesso anyway but I made sure to use my Helmar 450 glue to adhere them down securely.


To add a bit more texture to the centre of the canvas I have added a piece of cheese cloth that I have pulled and frayed a bit as well as some pearl string around my rough circle. These elements were also adhered with my 450 so they would dry quickly and be adhered securely. 
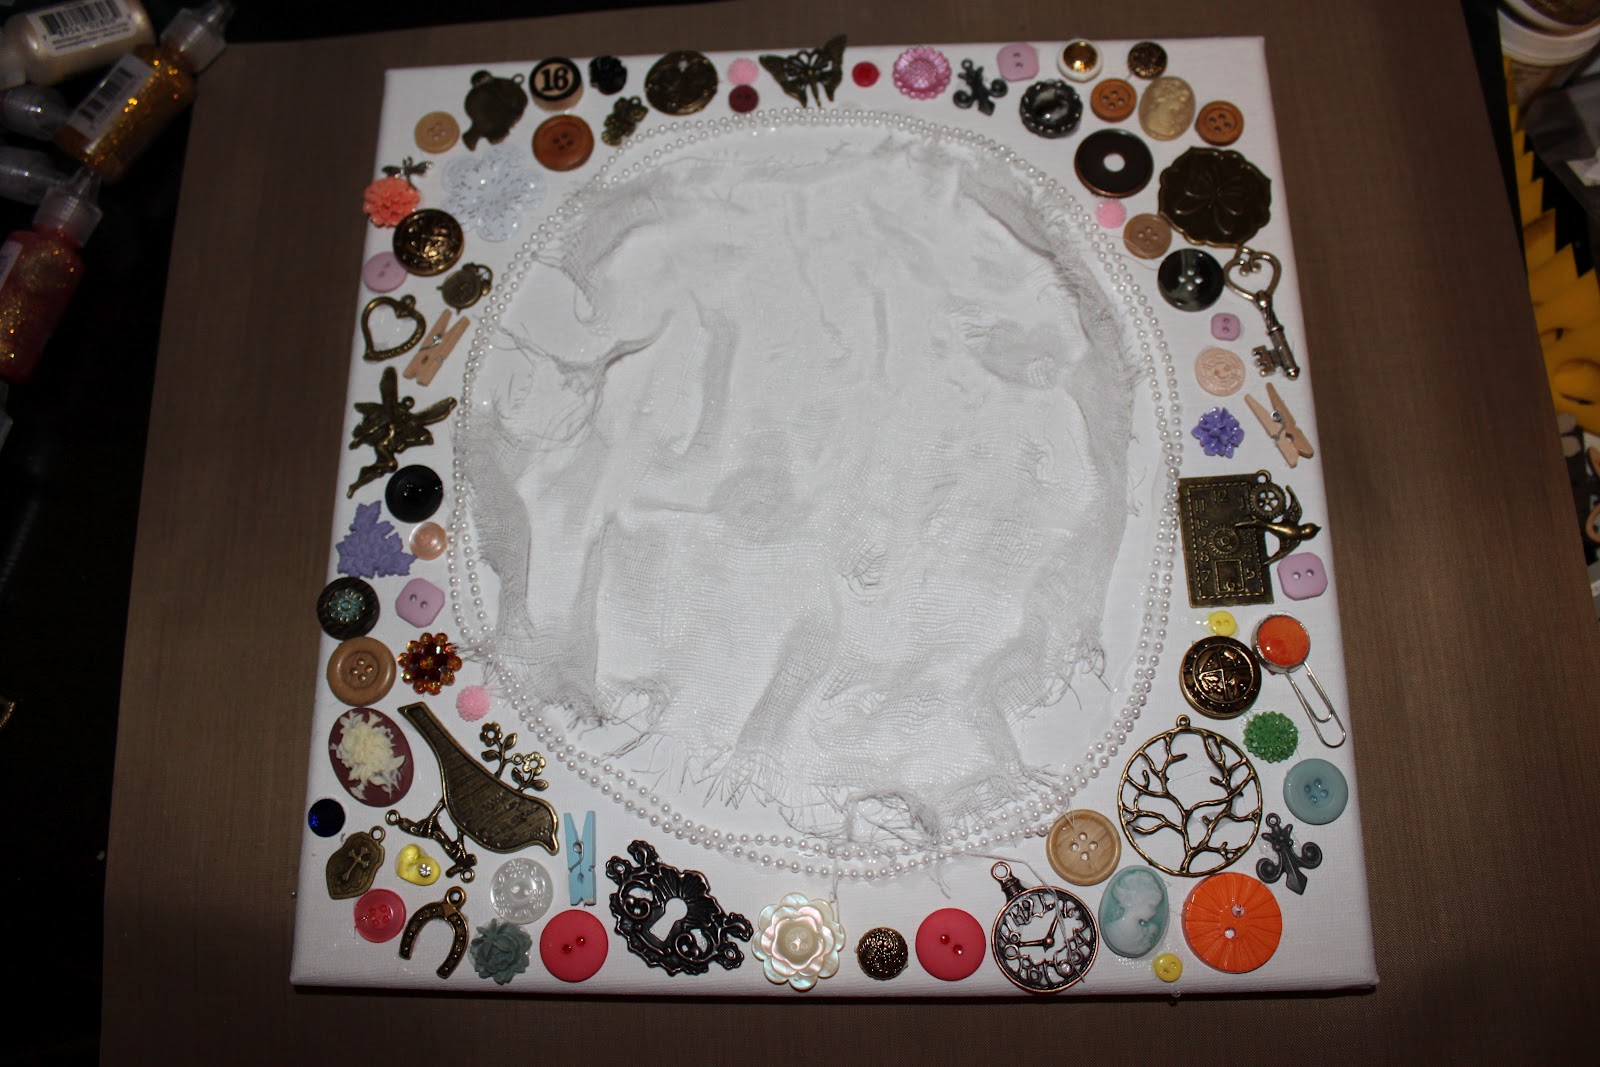

Next step was to cover every element completely with White Gesso. I actually thinned my gesso down a little with a small amount of water simply because I wanted the texture of the treasures to really show through and not have my Gesso Brush marks leaving texture over it. A good tip when using 3D elements like this and covering them is to keep rotating the project around to ensure all sides and inside all little button holes etc are covered. 


I let the Gesso dry overnight and like I said it turned out to be a couple of weeks LOL so when I did get a chance to sit down the other night and finish this I was determined to just go with the flow and the rest of this project is in no way step by step, it was just add a bit here oh a bit more there, hmm maybe more there oh ooh aahh LOL. So in saying that here are the mediums and products I used to cover the canvas and it was a completely random process however I did use my acrylic paints first and allowed them to dry followed by the other mediums......

Products Used
Kaisercraft Acrylic Paint Colours Raw Umber, Antique White, Mud Puddle
AdirondackPaint Dauber Espresso
Tattered Angels Glimmer Mist Colours Walnut Gold, Suede, Tattered Leather, Brick
Tattered Angels Glimmer Glaze Fuzzy Coconut
Tattered Angels Glimmer Glam Espresso Bean &  Hayride
Ranger Perfect Pearls Bronze, Gold & Chocolate
Tim Holtz Crackle Paint Rock Candy
Helmar Antique Sealer

Well that is all from me today thanks for looking and until next time, happy scrapping!

Amy Prior xx

Tuesday, March 6, 2012

Boys with Attitude & Issues

Hi everyone! Tonight I wanted to share with you all a layout that is packed full of tonnes of techniques! This was my first attempt at a grungey mixed media male layout and I have hopefully pulled it off! WARNING this is a very photo heavy post

So here is the layout and I have used a photo of 5 of my brothers together being their usual "special" selves LOL.


Here are some closeup piccies for you to see some of the amazing details of this layout. 


This fabulous Chipboard title from A2Z Scraplets I have coated with black gesso and followed that with some Perfect Pearls from Ranger in Turquoise, Red & Sapphire. After applying the Perfect Pearls Powder I have sprayed some Oil Slick Chalkboard Mist from Tattered Angels but I held it about a metre above the chipboard so it simply left black spots dropped over the surface. Outlining the  edges with sharpie was the final touch this title needed :)


I have added lots of finishing touches including some Tim Holtz Ideaology. 


Some more fabulous A2Z Scraplets Chipboard goodies shown here including Cogs & Twisty Barbed Wire. You can also see a transparency clock pictured here from the Kaisercraft 13th Hour Acetate Shapes.


Some close ups of the fabulous textures added to the already amazing Dreamer Collection Paper from 7 Dots Studio! Finnabair is one of my favourite idols in this industry and I am so honoured to be working with such amazing papers she has created for us all and I hope I have done them justice.


I really thoroughly enjoyed creating this page and playing with all the fabulous textures. Here are some quick tutorials on how some elements were created.


Starting off with this amazing paper from the 7 Dots Studio Collection Dreamer. I just love using bubble wrap in my creating and the colours of this paper worked perfectly with my photo as well!


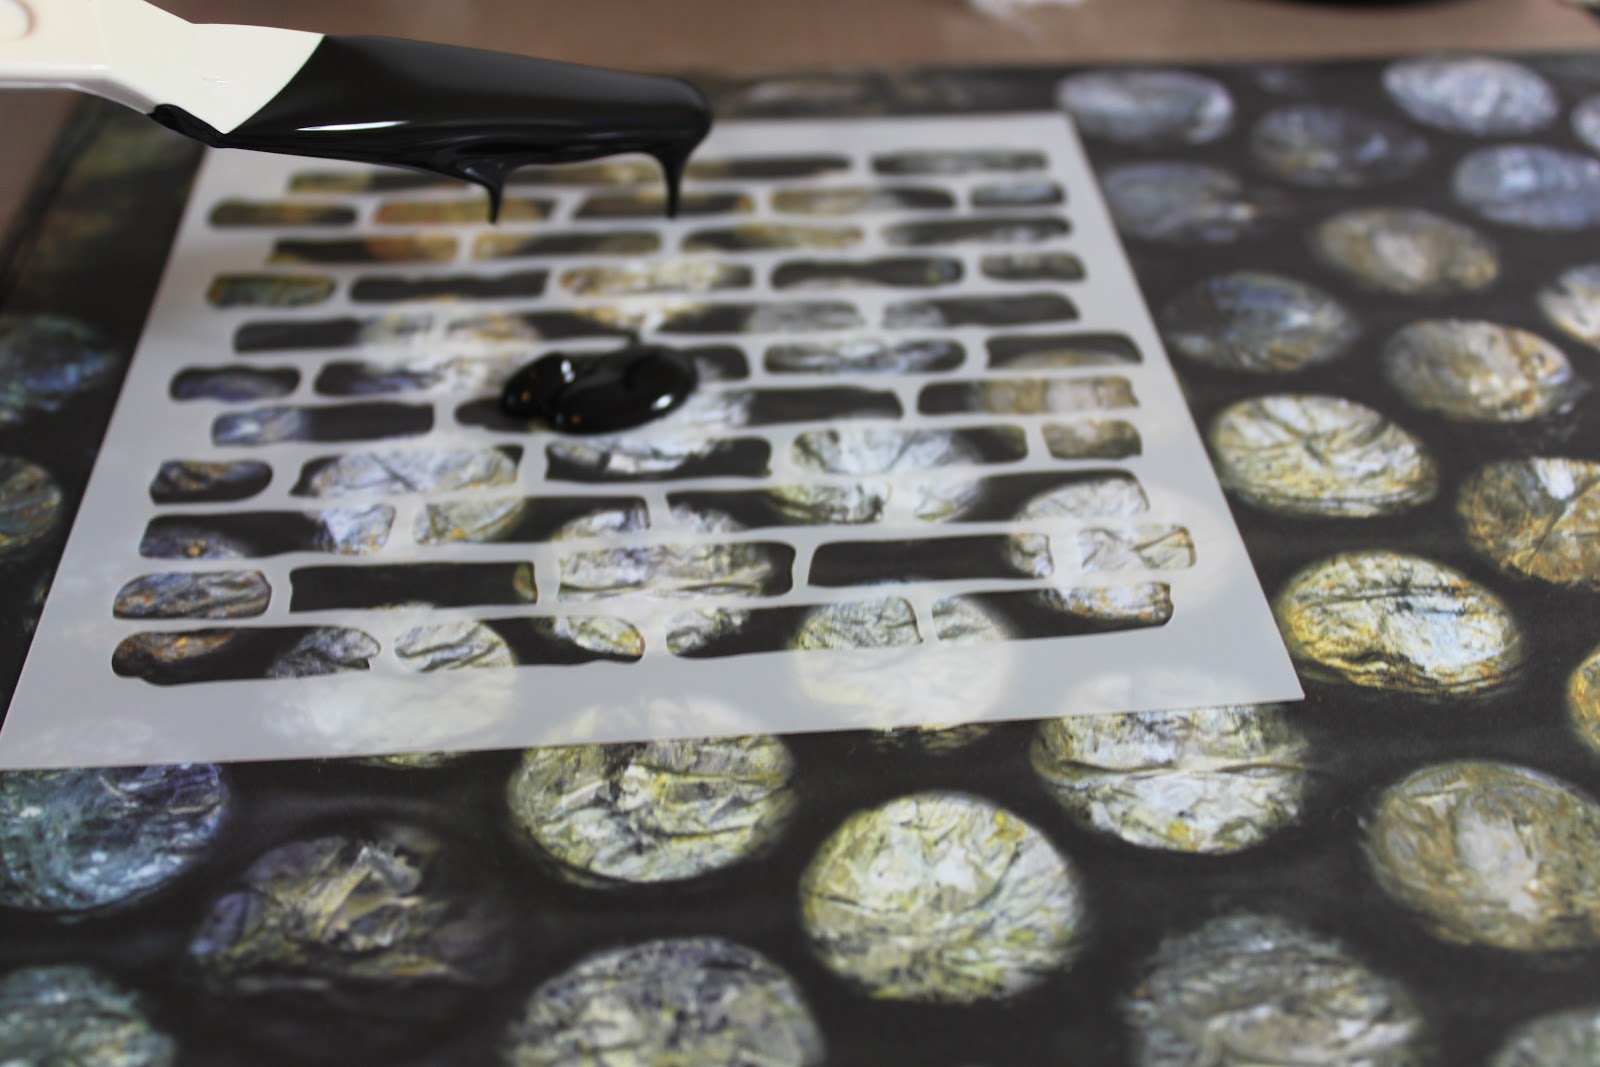
First up I have used my Crafters Workshop Brick Template with some Black Gesso. I have smoothed this over the template with a pallette knife and then I carefully lifted off the template to reveal the amazing brick pattern and set aside to dry.


I then started to play with my elements I wanted to use. Firstly I just knew that these cogs & barbed wire from A2Z Scraplets would be perfect for this masculine layout. Firstly I coated all the chipboard pieces with black gesso. I then began adding texture and other interest.


For this cog I grabbed some toilet paper and peeled off 1 ply thickness to start applying. I used a small paint brush with my gesso to make the toilet paper stick and then added more toilet paper using a clean paint brush with Sapphire Glimmer Glam and working in rough and circlular motions to create lots of texture. I then left this cog overnight to dry so I could trim the edges with my craft knife. An eyelet in the centre added a final touch and helped work in the other subtle silver elements on the page.


For this next cog I have used a new product to my stash which is Matte Goosebumps spray from Tsukineko. This was really fun to watch work and even more fun to let dry on my craft mat as it beads so well on that! LOL Anywho back to the tutorial, this fabulous product looks like a Glossy Accent type product yet in a spray bottle and when sprayed it leaves a goosebump yet matte finish. I thought this would work fabulously with my layout theme so I sprayed a little. Can you see the goosebump texture? And the beads on my craft mat? Was very cool! Anywho I put this one to the side and tried to work out how I could add some colour! The texture was not as textured as I hoped so inking was out of the question so I sat it to side to ponder.


I had one cog that I had left bare and decided to spray it with some Burnt Red Tattered Angels Glimmer Mist. I again was not 100% happy with this one so I put it to the side and pondered until I saw my fabulous collection of WOW Embossing Powders sitting in front of me and I simply knew what to do.


With such fabulous intricate designs, I did not want to add too much embossing powder to the surface plus I wanted to create a very distressed look. For both these cogs I decided to take my WOW Embossing Powder Call Me! Stamp Set and inked the surface very roughly with some embossing ink. For this red cog I have added some Skyline Grey Puff Embossing Powder from WOW. This powder is fabulous to work with and the puff always astounds me with how amazing the texture is! 


This next cog needed a little bit of colour to break up the solid matte black so I have again used the WOW Call Me! Stamp but this time I have used Cable Car Red, Bay Area Blue & Tea Garden Green all from the fabulous Suzy West Collections! This technique was very simple. After stamping your embossing ink simply sprinkle a small amount of each colour randomly until all areas are covered and then tap off and heat. Voila! I actually didn't tap off the excess of this one because I again wanted a very distressed look.


Now that the Gesso on my paper was dry I could start to add other elements to create more texture on my page. Firstly I have cut up small fragments of cheesecloth and really ripped and unthreaded them a lot before dipping into black gesso and getting very messy LOL. I have also splattered lots of the black Gesso all over the paper to add more texture.


For a bit more texture I have used my WOW Call Me stamp again with some Skyline Grey Puff Embossing Powder. I only wanted to stamp a small area of the stamp onto my page so I have used my sponge dauber to roughly ink my stamp.


 Just that little area of embossed writing here and there was the final textures the base paper needed now I simply need to add more colour and glimmer because after all, I am a girlie layout kinda gal usually LOL I cannot give everything up :)


There were sooooo many elements and techniques used in this layout that I could go on for hours but I hope you have been inspired to try some grungey or mixed media projects yourself. Be sure to step outside your comfort zones if you see something you want to try!

Until next time! Happy Scrapping!

Amy Prior xxx


Saturday, March 3, 2012

A2Z Sketch Challenge

Good morning everyone! I hope your day is starting off well and for those on the other side of the world night night! :)

Today I wanted to quickly share with you the new fabulous Sketch Challenge over at A2Z Scraplets for March. The sketch this month was chosen by Caz and is from the always inspiring Becky Fleck from  PageMaps.

Here is the sketch she chose and be sure to head on over to the A2Z Scraplets blog to join in the fun! You can win some chippie goodness WOOHOO!


And here is my take on the sketch:


And some closeups of course:


I cannot get over how alike my girls look in these photos. You can hardly tell that the top is Chloe and the bottom pic is of Mia. They both fell asleep on the lounge one night so I simply had to get a few snaps on my IPhone using my cool new vintage photo app! LOL

Did you see thos divine Scraplets I have used? Both the Chipboard Fairy sitting on the moon as well as the Innocence Title are from A2Z Scraplets. I have covered the Innocence title with Liquid Pearls using circular motions as I applied to create the interesting texture and pattern you can see in the pearl. The Moon I have covered in coordinating papers from the range I was working with and then I have inked the edges as well as coated the paper with some Dazzling Diamonds Glimmer Mist from Tattered Angels. Lastly I coated the fairy using Liquid Pearls in the same technique I used on the title. These pieces add such a whimsical feel to the entire layout and are truly so much more stunning in real life!

Products used for this layout include:


A2Z Scraplets Fairy 6
A2Z Scraplets Innocence Scripty Word

Scrap Cake Bright Side of Life Papers
Scrap Cake Bright Side of Life Borders
Chip Chop Shop Crochet Trim
Ranger Liquid Pearls Biqsue & Rose Petal
Helmar Scrap Dots

Till next time Happy Scrapping!

Amy P xx

Friday, March 2, 2012

Cardabilities Sketch #50!

WOW can you believe that is March already? Where did the first 2 months dissapear to? LOL Anyway now that we are here there is tonnes of fabulous challenges around for the beginning of the new month and of course a new sketch over at Cardabilities! Karan has outdone herself with this fabulous sketch and the other amazing Design Team members have also worked wonders with the sketch as well!

Here is the sketch


And here is my take on this gorgeous sketch. 


Now for some reason I have not taken close up pics of this one yet which is very odd for me LOL (I usually take at least 10 different closeups and choose the best) but I will try adding them later through the weekend. 

Products used for this card include:
Scrap Cake Brighter Side of Life Papers
Green Tara Lace
Kaisercraft Pearl Trim
Molossi Pearl Trim
My Favorite Things Stamp
Prima flowers
Green Tara flowers
Kaisercraft flowers

Thanks for looking!
Amy P xxx

Thursday, February 16, 2012

WOW Blog Hop!!!!! Cards & Quick Tutorial!

Hi there! I hope you have all had a fabulous, love-filled week so far! I am here today to share with you some fabulous WOW Embossing Powders used in ways that will simply WOW you PLUS I have a mini tutorial that I know a lot of you have been waiting for! 

First up I need to let you know that you are in the middle of the WOW Embossing Powder Blog Hop and you can win some fabulous prizes!!!! Be sure to click here and visit the WOW Blog to become a follower and leave a comment. Then click along and visit all of the Design Team blogs for more chances to win TOO EASY! Also be sure to checkout the WOW Facebook Fan Page and become a follower because there is always a chance to win some fabulous Powdery goodness there too!


And now let's get onto the Crafty Inspiration! Today I have a  Thank You Card I have created using mainly the colours Red, Pink & White in honour of this Magical LOVE week. 


The technique I have used on the background of this card is a very very simple one however I have had dozens of people ask me about it so I thought I would do a very quick tutorial for you all.

Simply grab some cardstock and place your favourite template/screen/mask over the top. 


Next up simply grab your Embossing Ink Pad or a Versamark Pad etc and carefully cover all areas of the template without it moving or being bumped. 


Lift off your template and place to the side to clean later. Quickly grab the coloured powders you would like to use and then carefully sprinkle small amounts over the stamped image. Try to avoid using too much as the powder will not be able to be saved in individual shades. I do however keep the mixed colour in a seperate jar as I love mixing the colours together LOL. A handy tip is to have your powders chosen and in front of you ready with their lids off before you start stamping the template. 


Gently shake and tap any excess off into your spare jar and  voila! you have a beautiful pattern on your cardstock. Simply heat with your heat tool and you can then use the cardstock for a layout, card or even to make your own cut out embellishments. The possibilities are endless!


Thanks so much for joining in the blog hop and I hope you have enjoyed my inspiration for today! Be sure to  come back regularly as we will be holding regular challenges soon here on the blog as well as having a mini store and other things available so stay tuned!

Amy P xxx


Friday, February 3, 2012

A2Z Scraplets Sketch Challenge

What a gorgeous sketch there is this month designed by the always lovely Liz Webber. Click here to check it out and enter to win some A2Z Scraplet chippies woo hoo!

Here is the sketch...


And here is my example....


And some closeups of course! I have used the gorgeous Echo Park Collection Springtime which you can purchase here. Of course I have also used some A2Z Scraplets and I have covered these gorgeous flourishes in Ranger Liquid Pearls which are available to purchase here.


Checkout the cute banner I have made using the Echo Park Springtime Elements Stickers. Flat stickers seem to be fading out in this industry as dimension becomes more and more important to scrappers worldwide however I beg to differ. I think Stickers can have just as much dimension as you want them to have. For instance checkout the sticker sheet I have used these stickers from...


...now as you can see, the banner sticker I have used is straight and yet the "You are my sunshine title"  wavy. To create the effect below, I have simply cut out each triangle from the banner seperately and then adhered how I wanted it to sit on the title. To cover up any overlapping corners I have used a Kaisercraft Pearl Strip and voila a gorgeous title! To add dimension I have mounted this title using Helmar Scrap Dots which is a clear liquid adhesive that dries the thickness you make it! WOO HOO has there ever been a better 3D adhesive? I am yet to find one LOL 


As you can see I have also mounted this title over the top of a divine Boutique Creations Handmade Doiley (click here to purchase) and of course this meant that I needed one side to have thicker glue than the other side. Scrap Dots made this task too easy and I am loving the results!


Last but not least I have used a tonne of Manor House Creations Flowers which can be found here as well as some Prima flowers and Kaisercraft.

Most mentioned products are links to purchase them at the cheapest prices in Australia Guaranteed!

Thanks so much for looking! Until Next time....happy scrapping!!!

Amy xxxx

Scrap Cake, Echo Park & we have a WINNER!

Ok so this will be a super quick post as it is 1am here at the moment but I just had to share some fabulous cards I have made recently. People often ask me if my cards ever fit into the envelopes and the answer is YES! I never use flowers etc that I know won't "bounce" back if squashed a little in an envelope and great glue is always the key! Scrap Dots by Helmar are my fave!

Ok so onto the first card, I have a dear friends wedding coming up and although I had planned on making her a card that would match her theme, I ended up the complete opposite as I just fell in love with these Scrap Cake Papers! The Collection is "The Bright Side of Life Collection"and you can purchase these papers here on my website.


As you can see, I have used these gorgeous papers to also make some flowers using the My Favorite Things Die Namics here. There are also some amazing Manor House Creations flowers in this cluster as well as Prima & Kaisercraft! 


Checkout the gorgeous detail in the machine stitching and I am in love with this metal frame from the Girls Paperie and we sell the set of 2 frames here for only $5.99! The stamp I have used is a Stampin Up stamp I am pretty sure and the little birdie is a Wooden Flourish from Kaisercraft that I have simply painted and then Glimmer Misted. You can see our range of Glimmer Mist products on the website here.


Next up is this gorgeous Valentines Day Card that  I have created using the new Yours Truly Collection from Echo Park. I have had these love heart doilies in my stash for a while now and was unsure how to use them so when creating this card I knew exactly what I wanted to do! 


We do not have this collection in the shop yet but please feel free to leave a comment here if you would like me to order this collection in. I really wanted to add black to this card without too much grunge so I have lightly inked all the edges as well as machine sewn. The Scalloped ribbon used was actually 1 thick piece of Scalloped Velvet Ribbon from a Websters Trim Pack that I have cut down the centre and then left only the scallops showing. The small amount of contrast I feel has definately gone a long way.


I hope you have enjoyed looking at my cards as much as I enjoyed making them! Before I go I have to announce the winner of our $50 voucher giveaway!!!!!

Drum Roll Please.......................


And the winner is.........................................


...............................................
...................


Julene Matthews!!!!! 

Congratulations hunnie please email amy_prior@live.com so I can send you your voucher WOO HOO!!!!!

Thanks for reading everyone and until next time....

....happy scrapping!

Amy xxx