Please excuse any untidiness while I makeover my blog among other projects and endeavours.

Monday, March 26, 2012

Kaisercraft Tiger Lily Collection

Hi everyone! Just wanted to quickly share a layout I created using the simply gorgeous Kaisercraft Tiger Lilly Collection that is available at Passion 4 Paper to purchase here.


I love the colour combo of this range and I have created a background using various Tim Holtz Distress Stains to match the colours. 


Checkout this gorgeous Plum Grace Flourish from Flourish with a Bling!


For my title, I have chosen to use this gorgeous Corner Word from A2Z Scraplets. I have coated the words in various mediums including Perfect Pearls, Liquid Pearls and Crackle Medium. 


To finish off the layout, before adding my photos, I sprayed everything with Old Lace Glimmer Mist by Tattered Angels


Then after distressing these photos of my gorgeous girl Chloe, I adhered them and the layout was complete!


Thanks so much for looking and until next time, happy scrapping!


Passion 4 Paper!

Last week I had some exciting news to share but I have been so flat out that I haven't had a chance to blog here about it! So without further ado, Passion 4 Paper announced their fabulous new Design Team...


*Amy Prior (yayyyyy!!!)


I am so very excited to be a part of this team and urge you all to go and checkout this amazing store! I have already ordered twice and I haven't received my first DT kit yet eeekkk! LOL You will not be dissapointed with the products available, or the prices and there is tonnes of new goodies being added every single day so be sure to chekout the store regularly and become a fan of theirs on Facebook here. You can see my Design Team Introduction post here on the Passion 4 Paper Blog!

Friday, March 16, 2012

Cardabilities Sketch #51

WOW another fabulous Card Sketch from Karan Gerber this month over at Cardabilities. Click here to check it out and enter your take.

Here is my take on the sketch using the amazing new line from My Minds Eye "Miss Caroline". I just adore the wood and bright colours of this collection and mixed with the amazing WOW Embossing Powders just really made this card POP!


The WOW Embossing Powder colours used are Bay Area Blue, Whirly Pop & California Sunshine which are all from the Suzy West Collections. To create the effects shown I simply inked all my edges with Versamark and then sprinkled, tapped & heated. 


The Scallop Doiley has been cut using my Nested Scalloped Circles Quickutz Die and these beautiful flowers were cut using My Favorite Things Flower Layers Die. I have used the Miss Caroline Collection Papers for these die cuts and have also embossed all the edges.


A closeup of some of the beautiful detail of the papers and the embossing.


And lastly, a closeup of these gorgeous flowers. After embossing the edges of these, I have simply curled the petals upwards before using the brads to join the layers together.

Thanks so much for looking and until next time, happy scrapping!

Amy P xxx 

Monday, March 12, 2012

So much Scraplet Goodness

I just wanted to do a quick blog post and share the layouts I created for the A2Z Scraplets February Releases.


First up is the layout I created using this gorgeous title Angel of Mine. I have used the Kaisercraft Lil Primrose Collection which worked fabulous and the chipboard is simply coated with some Picket Fence white Crackle Paint by Tim Holtz.


And a couple of close ups of course :)


The next new release I had to play with was this gorgeous Torso shape! I just love all the new Torso/Mannequin designs that Julie has come up with. On this layout I also used the Bright Eyes Title and the Paisley 26 Flourish.


The torso is covered in a layer of pink paint that I allowd to dry. I then added a coat of Gesso over the top and scraped it off after a couple of minutes. This created this very shabby chic look. Liquid Pearls then was used to add a belt and necklace as well as being used on the title and flourish chipboards.


And a couple more close ups for you...


Aren't these Scrap Cake papers simply divine? I just love the Brighter Side of Life Collection from Scrap Cake and their new release collections are amazing as well! 


Onto the next new release Chipboard I had the pleasure of playing with and it is another Title "At the Park".


I am so sorry about the photo being on it's side it was not playing nice for me :( .  This chipboard title was so much fun to play with. I added some texture using Gesso which also was my primer before I started playing with some Watercolour pencils. I think this is my new favourite technique on chipboard as you have so much freedom when using the watercolour pencils and you can go over it again and again. I then outlined the entire chipboard using my sharpie. 


Here are some closeups and you can see the amazing texture and colours.


I have used the fabulous Echo Park Paper Range "Playground" for this layout. The papers were of course perfect for the photos and the white cardstock is from Bazzil.


Yet another sidewards picture that Blogger seems to hate so very sorry :( This new release chipboard was the Chicken Wire which is a huge thing at present especially this hexagon style! I have created this layout using the My Minds Eye Krafty Funday Collection. I also used 2 Scraplets Bees.


For these Scraplets I simply coated them in a layer of black gesso followed by a coat of Jingle Bells Glimmer Mist from Tattered Angels. I then adhered the 2 bee shapes together and filled in the gaps on the body with Buttercup Liquid Pearls from Ranger. I love how this layout turned out


Here are some closeups of the layout. As you can see the buzzing bee is sitting on some tulle which really helped it jump off the page.


When I was painting the chicken wire with gesso, I have also used it as a stencil on the top left corner of the paper. I then coated the entire paper with the Jingle Bells Glimmer Mist before I started adhering everything.


Last but not least is another new title that I got to play with and I knew straight away that I wanted to use these instagram photos from my phone for the layout. I have also used the Floral Frame 2 from A2Z Scraplets as well.


For this layout I have used the Sweet Nothings Range from Kaisercraft along with some 12x12 Corrugated Kraft from Jillibean Soup. The chipboard title "Look at Me" was created using various layers of paints, glimmer mists, glimmer glaze and glimmer glam all from Tattered Angels. I simply kept adding colour until the colours worked and I got the grungey look I was after.


The texture really is incredible on the title and here is a close up for you.


With the flower frame, I have covered it in paper from the Sweet Nothings range, then I have sprayed the entire chipboard with Sapphire Glimmer Mist and let it dry. After that dried I added some Fuzzy Coconut Glimmer Glaze to the Flower heads and let that dry before adding Walnut Gold Glimmer Mist to the entire frame. The last step was inking the edges with some Black Soot Distress Ink. I find the easiest way to ink such delicate areas is by using a cotton tip from my bathroom. 


The Prima Butterflies have also had some Glimmer Glaze added.


The cluster of flowers includes brands like Manor House Creations, Prima Marketing, Green Tara & Kaisercraft. I have inked, misted and distressed all these flowers to tie in with the rest of the layout. 


Lastly I wanted to quickly share a layout that I have just blogged about over on the A2Z Scraplets Blog. Be sure to head on over there and see the closeups pic of this gorgeous double layout!


WOW what a mammoth blog post. Thanks so much for looking and be sure to become a follower as I have some exciting blog candy up for grabs VERY SOON!!!! (maybe this week sshhhh) LOL

Until next time, happy scrapping!

Amy Prior xxxxx

Thursday, March 8, 2012

Our Crazy Wolf Pack

Hi there! I hope any of my readers in flood or fire affected areas throughout Australia are keeping safe! My heart goes out to all who have lost so much already :(

I quickly wanted to share with you tonight a fabulous and colourful layout I created recently for Scrap Sanity's Cyber Crop. Be sure to read through to the end to see how I created this amazing paint effect!


So the challenge was called Get Messy and there was a sketch to work by plus the added challenge of making it look like something had spilled on your layout. I really enjoyed getting messy with this one and yes I used The Crafters Workshop 6x6 Paint Splatter template for the top as I am not confident with large splatters myself LOL so I ended up with a very neat messy layout I think.


After adding the Kaisercraft Acrylic paint & Tattered Angels Chandelier Glimmer Glam to the bottom of the cardstock I set it aside to dry. Whilst that was drying I coated this fabulous Chipboard Border from Dusty Attic with White Gesso and allowd that to dry also overnight. The next day it was much easier to work with the chipboard to line up the colours correctly. I simply place my chipboard where I wanted onto my layout without gluing. I then grabbed a lead pencil and marked where the chipboard was to be placed so I would know where to come back to, then I used the pencil to mark out where my colours should be painted onto the chipboard. This was very simple and I simply put a thick enough layer of paint over the chipboard so you could no longer see the pencil lines. Again after letting this dry I covered it with Chandelier Glimmer Glam.

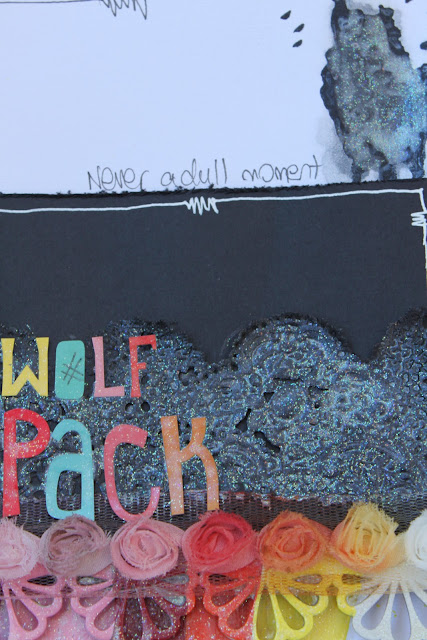
I have used 2 pieces of White Bazzil Cardstock for the background so it could handle the amount of wet mediums I was planning on adding. I have also mounted my photo onto some yellow & black Bazzil. The amazing texture behind my title is actually a piece of black paper lace that I recently purchased from Scrap Matrix and I have coated it with Chandelier Glimmer Glam from Tattered Angels.


The Paint Splatters were created using my Crafters Workshop 6x6 Paint Splatter Template and Black Gesso. After this dried I added a spray of Tattered Angels Abominable Snowman Glimmer Mist and finally some Tattered Angels Chandelier Glimmer Glam. I also scratched the edges of my photo with my paper piercer to add a distressed finish to the photo.


Some doodling around the edges & some journalling was the final step in creating this layout. I have used my Black and White Markers from Stampin Up for the task. I was really happy with how this layout turned out and I know my crazy little Wolf Pack loves it too LOL. Now here is a little tutorial showing how I created this paint effect. It is very simple even my 4 year old was able to do this.


First I simply placed a large blob of each colour paint in a straight line across my page. Here is a picture using just 2 paint colours but for the above layout I actually used 13 colours.


Next I have used an old pizza box and opened it up so that the top lid was leaning against the wall slightly. When I leaned my paper against the lid which was against the wall, you could see the drips start immediately and I left it over night to drip and dry. You could also hang it on the clothesline outside just try have something underneath to catch any runaway paint. And Voila! It really is that simple and the result is amazing.

Hope you enjoyed my mini tutorial and until next time, happy scrapping!

Amy Prior xx